Hi Stampers
Thank you for stopping by today. Being off work gives me the opportunity to play in my studio. I am usually creating for Clubs and Classes and don’t often get to sit down and stamp for me. Gotta say, I am loving it. But I realize every year when I get the time off between Christmas and New Year’s that I could easily become a night owl. I love stamping late into the evening (ok.. sometimes early morning). I know it is a novelty and only for two weeks but I wonder about retirement and would this become the norm. It kind of frightens me.
I was actually tired last night and went to bed early (midnight) with a cup of “Sleepy Time Tea”…. love that stuff. I had a great night sleep and was up at a decent time. I went to the bathroom and found water on the floor. It wasn’t a lot but I couldn’t figure out where it came from. I checked around the toilet, sink etc and there was no water there. As I was on my hands/knees I felt a drop from the ceiling. Yep… dripping from the vent in the bathroom. I had the roof done in 2013. With the weather last night / wind / snow / rain, I can only assume that is where the drip is coming from. Called the roofer and he will be out tomorrow to check it out. Keeping my fingers crossed it is something simple and under warranty!!!!
I know you came here to see a card and not hear about the roof.. but you know… All is Good and I am Grateful to have a roof over my head and a wee little house that I love. So today’s card….
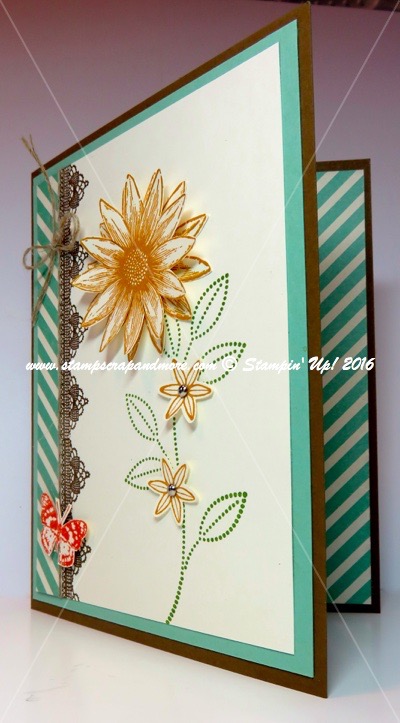
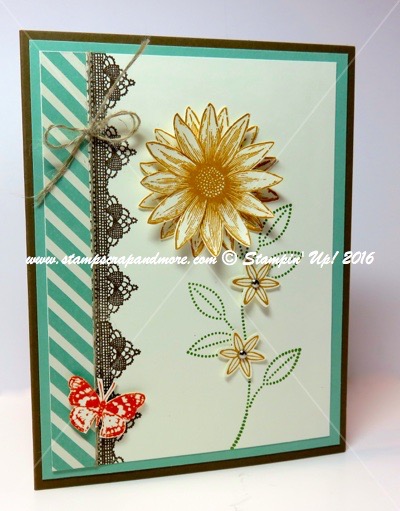
Grateful Bunch
Yes I am Grateful for all that I have (what the heck is in that Sleeping Time Tea:)). I won this stamp set at “On Stage” in Mississauga and it is from the Occasions 2016 Catalogue. The best part of this stamp set, is the co-ordinating punch “Blossom Bunch Punch” and it will be available as a bundle. The DSP is from the Pretty Petals Designer Series Paper Stack. This is a simple card and I love the colour combination.
Product Used:
- Grateful Bunch
- Soft Suede card stock
- Mint Macaroon card stock
- Very Vanilla card stock
- Blossom Bunch Punch
- Pretty Petals Designer Series Paper Stack
- Old Olive stamp pad
- Delightful Dijon stamp pad
- Tangerine Tango stamp pad
- Linen Thread
- Mini Brads
- Dimensionals
- Snail Adhesive
How to:
- Soft Suede card stock card base 5 1/2′ x 8 1/2″ – scored and folded in half = 5 1/2″ x 4 1/4″.
- Mint Macaroon card stock layer 5 1/4″ x 4″
- Very Vanilla layer 5″ x 3 3/4″
- Pretty Petals DSP 5″ x 1/2″
- Dry fit the Pretty Petals on the Very Vanilla card stock and draw a very light pencil mark on the Very Vanilla. This will give you an approximate placement for the lace image.
- Using the Lace stamp and the Soft Suede ink, stamp along this line. You will have to do this twice. Not to worry if you don’t perfectly line up the edge of the lace, you can place the Butterfly over any imperfections. Also don’t try to stamp perfectly along the edge of the pencil line. You are better off if you stamp over it a titch (yes that is an official measurement term :)). That way there won’t be a gap between the DSP and the Lace image.
- Once you stamp the Lace border, adhere the DSP.
- Wrap the Linen Thread twice around the card covering the seam of the DSP.
- Stamp the stem in Old Olive.
- Stamp the large Bloom in Delightful Dijon directly onto the Very Vanilla.
- Stamp a second large Bloom on scrap Very Vanilla paper in Delightful Dijon and fussy cut it out.
- Stamp the trio of flowers on another scrap of Very Vanilla. Punch these out. I used two small flowers but you could use any combination.
- For the small flowers I have them held on to the Very Vanilla card base with a Mini Brad each.
- Stamp the Butterfly in Tangerine Tango and fussy cut this out.
- Mount the Mint Macroon to the card base.
- Mount the Very Vanilla to the Mint Macroon
- Use a dimensional to adhere the large Bloom that you fussy cut to the card base (over the one you stamped directly onto the Very Vanilla)
- Use a Dimensional to adhere the Butterfly to where it looks best on your card.
If you want to finish the inside of the card:
- 5 1/2″ x 4 1/4″ Very Vanilla Card base.
- Pretty Petals DSP 5 1/2″ x 3/4″
- Stamp inside sentiment on Very Vanilla
- Adhere the DSP to the right side of the Very Vanilla
- Adhere to the inside of the card.
Perfecto!
To switch it up a bit, I have also made this card using some Gold Glimmer Paper and 1/2″ circle punch. Add it to the inside of the centre of the large bloom with some Tombow Adhesive. It gives the card some nice bling.
Thanks for stopping by,Elizabeth, Your Stampin' Up! Demonstrator
www.StampScrapAndMore.com
Hi Janet
Thank you so much for your comment. I have added instructions to the post. Hope this help. If you need any clarification, just shout.
LOVE THIS CARD ! I’M A STAMPIN UP DEMONSTATOR ALSO. MY LADIES WANTS TO MAKE IT. WOULD LOVE IT IF COULD SEND ME THE MEASERMENTS OF YOUR CARD.